Tuesday, 29 November 2011

Caving "A Real And Incredible" Experience


Tight Fit Going In
 After searching for several hours in really rugged terrain we came across two suspected caves that we hoped lead to the mother load below. After gearing up with ropes, lights and other gear it was time to try and squeeze through a tight, and I mean tight opening to do the initial search below. There was barely enough room to get into the opening. I had to inhale and make the final push through. At that point I wondered now I'm in, how do I get out? The anticipation and the adrenaline were both running on high at that point as I descended into an awesome small cavern with a pounding heart and all senses on fire. Wow what a rush!

Other Side Of The Entrance Going In
 This is my fellow caver coming through the entrance into the cavern. Using the rope to support body weight and not relying on loose rock that can break off and bury you is what caving is all about. The rule is NEVER rely on any structure to support you unless it's below your feet and even then it's risky to some degree. Usually the air quality in caves is not that good, however we have no way of knowing how bad so exposure times are limited depending on how bad the stench. In this case the air seemed good. Typically other creatures lurk in caves other than humans and leave their scat behind and in some cases more than others depending on the size and number of creatures that happen to reside there. 

The Rope Is Your Way Out


 The Rope is your way out so protecting it's integrity is paramount. As we descend further into the abyss great care is taken with rope placement. Jagged edges of rock can shear the rope and leave you stranded below. Pictured to the right is the rope between a rock and a hard place. I am on the other side of a precarious crack looking back after laying rope. In some cases we lay secondary ropes which  are rigged to huge boulders as a fail safe to get back, in case the main rope shears.


Passage To The Abyss
This is the main passage into the world below there was a draft coming up the tunnel meaning there is another end to this cave somewhere? This part of the decent was more open and so we were a little less concerned than the previous two tight squeezes behind us. It's about this time that you are checking for spare batteries and other equipment before descending further.


Life Beneath Canada


We are using ARC lights with Nickle Metal Hydride batteries. The ARC light burns with incredible intensity pictured here, with a burn time of six hours on the low setting. These lights are great for caving as they burn a blue white light mix, close to daylight. This enables us to see into every crack and crevice and penetrate the blackness  well into the caves interior. When we turned off the lights you can't see a thing, only the glow of my watch and the iridescent glow of moss or lichen stuck to the caves walls. We wonder if it is radioactive.
The Final Push To The Corridor
Finally we get to what we think is the only passage to the mother load below. After squeezing through this tight spot we soon realised we would have to turn back. Over the years falling rocks have virtually closed the passage below. However we were able to get a good look into this low corridor that ran about 50 feet further down and appears to open into a larger cavern below. There was now wind in my face coming up the 30 degree rock strewn tunnel indicating an other opening somewhere.The plan is to explore the exterior and try and find another way in. The other plan is to send a remote control "Cave Rover" equipped with an on board video and lighting system down the tunnel.


Returning To The Outside "The Climb"
 I managed to grab this shot of my caving partner on the ascent back to the surface. This cave is a "Real And Incredible Experience" without a doubt. We will be returning some time in the future in hopes of discovering the rest of the hidden passages below. Stay tuned to the blog for updates.


Cave Rover In Action


"The Daltonator" Woodstoves And Storage Tanks

Bakers Choice Cook stove
Heart Of
"The Daltonator"
The Bakers Choice Wood Cook stove is the heart of "The Daltonator" DIY project and plays a vital role in the domestic hot water "off grid" heating system. Not only does this stove heat our house we also prepare some really hearty home cooked meals and what's more produce all of our hot water. The Bakers Choice Wood Cooker is a utilitarian style stove that is built like a tank from solid cast steel, without the flashy brass and copper that you find on modern day stoves. Built by the Mennonites this stove is all about getting the job done. It has a large stainless steel cooking surface with two removable cooking rings. A bread warming oven and a large enough cooking oven to fit a 20lb turkey. You can stoke the firebox with a 20 inch log and it will burn all night. The really cool thing with this stove is the stainless heat collector that fits inside the firebox.


Stainless Steel Heat Exchanger


Pressure And Temperature Gauges
Water is pumped with a Grundfos Boiler Pump through the heat exchanger and circulated through the domestic hot water tanks. I have increased the storage to 100 gallons of on demand hot water and the system is capable of boiling the storage tanks and so I had to engineer ways to control this. By using two control valves I was able to redirect hot water into a preheating heat exchanger and then back into the system. This effectively heated more cold water and acted as a heat dump for the tanks. Later I will be building radiators to heat other areas of the home. I also installed a 220 psi blow off valve and temperature and pressure gauges.


Water Storage Tanks

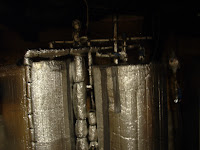
This is the storage system and pipe work that resides in the basement. I used the NASA like insulation rated at R60 to minimise heat loss. During the colder months we rely on the Cook stove to maintain the water temperature. When the sun is strong enough we then we rely on the Hydroponic Panel to do the job. Both can operate at the same time or independently.


Monday, 21 November 2011

Pumps Glycol Pressure And Heat...nasty if it goes wrong


Grundfos Boiler Pump
This the part where you HAVE TO GET IT RIGHT. I used a Grundfos boiler pump to circulate solar heated glycol which has 3 speed settings depending on the flow rate that you choose. The red tank top right is a boiler expansion which will compensate for pressure changes in the 1/2 inch copper pipe as the fluid expands and contracts with heat. Without this tank you could have an explosion due to boiling glycol, nasty stuff....I also installed a second pressure relief valve after the expansion tank, just in case and made certain to face the blow off away from the wife's laundry area. The pump is hooked to a 74 stage timer and kicks the pump on every 45 minutes for 15 minutes during the daylight hours. The green hose of which there are two in the system are to bleed air and to do fluid top ups when required.
Torpedo Casing Heat Exchanger
I used an old Torpedo Casing, (that's another story!) I just happened to have one lying around to house the heat exchanger. After winding two 50 ft lengths of 1/4 inch copper pipe around a 4 inch pipe to form two large spring like coils that ended up being 3ft in length each. After intertwining the two coils I had a first class heat exchanger. In a closed system such as this Glycol travels through one coil and water travels through the other and in a perfect world the heat transfers from one coil to the other.
After a lengthy battle of bending and coiling copper pipe I wrangled the heat exchanger into submission and got it tightly packed with the NASA insulation into the torpedo casing. One end of the casing threads off to get the Torpedo out or in my case to get to the heat exchanger in.

Temperature And Pressure Gages
 After hooking up the distribution lines and filling the system with Glycol, about 4 litres, I turned the pump on and had boiling glycol running through the heat exchanger within minutes. The heat exchanger looses about 10 percent across the board and the rest ends up in my domestic hot water tanks. I installed 2 pressure gauges and 2 temperature gauges to monitor the system. One set upstairs and one down, just to be on the safe side. And one last word pressure relief valves are worth their weight in gold , if all else fails, they don't. Stay tuned for the next component of "The Daltonator" Storage tanks and Wood stoves.

Going Off The Grid..One Step At A Time

"The Daltonator" Solar Boiler Panel
As the rising costs of energy are emptying all of our pockets as we go about day to day life can become frustrating and expensive. Simple things like heating domestic hot water, using electricity, running several basic appliances and being able to turn the lights on, has left me searching for an alternative.That alternative is the DIY project that I lovingly call "The Daltonator" with very good reason.
 I would have had to have graduated from Harvard to decipher the energy bill and I didn't, so alas the calculator spits out reams of paper and I'm non the wiser. There is a delivery charge, a debt retirement fee, a line maintenance fee, a just because you have power fee and yes the HST, etc. To add to the quandary we now have a Smart Meter installed by the power company. There are recommended times to use power, none of which seem convenient unless you want to cook and do laundry at 3 o'clock in the morning in hopes of not mortgaging your house with the power company.
Rear View Of  Daltonator Solar Boiler
To construct "The Daltonator Solar Boiler Panel" I used 75ft 0f 1/2 inch copper pipe(painted with high heat black paint) mounted on a 4ft by 4ft black piece of 1/2 inch flat stock. This is the heat sink that sucks the suns energy. Behind the heat sink is NASA like insulation of R60e, could have been used in the shuttle program for sure. The walls of the panel are 2by4's insulated with the same stuff. I painted everything with the high heat BLACK paint. The face of the panel is 1/4 inch Plexiglas sealed air tight with a rubber gasket. This traps hot air from the sun within the panel.
I installed a pressure relief valve behind the panel and pointed it in a safe direction, down. I used PEX piping to connect the in and out lines from the panel to the house and all are insulated with black foam pipe wrap. It's important not to have heat loss during fluid transfer so you can't over insulate, especially at minus 40 Celsius. Last but not least is the declination adjustment which for now is a manual shift using an old TV ceiling support. The panel only has to be moved twice a year for maximum solar angle, no big deal. During the fall season the panel is set at about 14 degrees and is pointed to solar south, different to magnetic south. This I determined by subtracting the declination for our longitude and latitude.
So what's the verdict; The initial tests took cold tap water to 65 Celsius in 45 minutes with the panel idle(not pumping fluid). I got about 10 litres of steaming hot water from the panel and burnt my hand during the process. In the next post I will explain how I transfer fluid from the panel through a home made heat exchanger and into my domestic hot water system.

Monday, 7 November 2011

The Adventures Of Batman

Bat In Flight
One of life's adventures here at Trips And Trails is the visits to the Bat Cave. Yes the cave is real and so are the Bats. Not for the faint of heart seeing ten thousand Bats up close and personal but a real and incredible experience none the less. We make 2 or 3 visits a year with those who dare to join us. The cave is about 500m in length and you need rubber boots and a light. These appear to be Brown Bats about the size of a mouse. Following the visit to the cave we generally go for a  hike, learn more about the area, compare photo's and then it's off in the Bat Mobile until the next visit. If you are into bats we would love to hear from you and may be you could join us next time.
clive@tripsandtrails.ca